Not always. Minor Teflon damage can often be addressed at home with the right approach. The challenge is knowing which type of damage is fixable—and which means it's time to move on. According to America's Test Kitchen, even well-maintained non-stick pans have a finite service life, so the repair-versus-replace decision matters both for your wallet and your safety.
This guide covers exactly that: 5 actionable steps to repair Teflon coating, the warning signs that tell you repair won't cut it, and a clear framework for deciding when to fix, patch, or replace.
Key Takeaways
- Repairable: Light scratches, residue buildup, minor sticking in localized spots
- Not repairable: Peeling, flaking, deep gouges, or warped pan bodies
- Repair process: Assess damage, clean the surface, apply a repair solution, cure it, then test before use
- Safety rule: If coating is flaking into food, stop using the pan immediately
What Is Teflon Coating?
Teflon is a brand name for polytetrafluoroethylene (PTFE), a synthetic fluoropolymer with an exceptionally low friction coefficient. Applied as a thin layer to cookware surfaces, it keeps food from bonding to the metal underneath.
PTFE's chemical inertness makes it useful well beyond the kitchen. Industrial applications—including the aluminum rotational molds manufactured by companies like Rotocast Technologies in Akron, Ohio—rely on PTFE coatings for the same reason: a low-friction, non-reactive surface that releases material cleanly and resists wear under repeated thermal cycling.
As a surface coating, PTFE degrades over time. Three factors accelerate that process:
- Heat exposure above recommended thresholds breaks down the polymer chain
- Abrasion from metal utensils or aggressive scrubbing scratches through the coating
- Improper cleaning — harsh detergents and scouring pads erode the surface over repeated cycles
Knowing which factor caused the damage helps you choose the right repair approach.
Common Signs Your Teflon Coating Is Failing
Most coating failures follow recognizable patterns. Knowing which symptom points to which cause tells you whether you're dealing with a fixable problem or a full replacement.
| Sign | Symptom | Likely Cause | Fixable? |
|---|---|---|---|
| Localized sticking | Eggs cling to specific spots | Residue buildup masking PTFE | ✅ Yes |
| Scratches/discoloration | Grey streaks, visible scoring | Metal utensils, abrasive scrubbers | ✅ Minor cases |
| Peeling or flaking | Chips or film visible in food | Overheating, advanced wear | ❌ No—replace |
| Warping | Pan wobbles on flat surface | Thermal shock | ❌ No—structural issue |
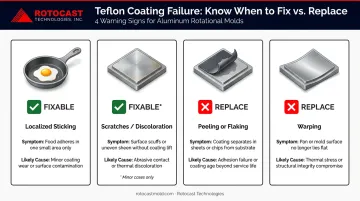
Warping is a pan-body problem, not a coating problem. No coating repair fixes a warped base—the pan needs to be replaced.
How to Repair Teflon Coating: 5 Steps
Attempting a repair without first assessing the damage type wastes time and can create safety risks. Work through these steps in order.
Step 1: Assess the Damage
Inspect the pan under good lighting and identify what you're actually dealing with:
- Surface residue or oxidation — dull appearance, sticking in patches, no visible physical damage
- Light scratches — shallow grey marks, coating still mostly intact
- Deep gouges or peeling — raised edges, visible flaking, coating separating from the pan
If you see widespread peeling, visible chips, or coating separating in sheets, stop here. That pan needs to be replaced, not repaired. Proceeding with a repair on a compromised PTFE layer won't restore safe performance.
Step 2: Clean the Surface Thoroughly
Before applying anything, you need a clean base. A surprising number of "coating failures" are actually just baked-on residue masking the PTFE surface, and cleaning alone fixes them.
- Wash with warm water, dish soap, and a soft sponge
- For stubborn buildup, apply a baking soda paste (3 parts baking soda, 1 part water) with a non-abrasive cloth
- Rinse completely and dry the pan fully before moving on
Avoid steel wool, scouring pads, or any abrasive scrubber; these create the exact surface damage you're trying to repair. Moisture trapped under a repair application also prevents adhesion, so make sure the pan is completely dry.
Step 3: Apply the Repair Solution
The right approach depends on the damage type:
For residue-caused sticking (no visible damage):
- Apply a very thin layer of high-smoke-point oil (flaxseed or vegetable oil both work well)
- Heat on low-to-medium heat for 2–3 minutes to restore surface lubricity
- This "re-seasoning" approach often completely resolves localized sticking
For minor scratches with partial coating loss:
- Use a food-safe non-stick repair spray or liquid polymer kit
- Two commonly available options are Rust-Oleum's non-stick coating spray and products in the Stone Chef line; both are polymer-based and marketed as food-safe, though manufacturer instructions vary on coverage and limitations
- Apply in thin, even coats to the damaged area only
- These are temporary fixes; they restore short-term performance but won't match the durability of the original factory coating
Step 4: Cure the Coating
Curing locks in whatever repair or seasoning you applied. Skipping or rushing this step is the most common reason repairs fail within days.
- For oil seasoning: Heat on low-to-medium for 2–3 minutes, then remove from heat
- For repair kit products: Follow the product's specific cure time and temperature (most require 10–20 minutes at low heat)
- Allow the pan to cool completely before rinsing, touching the surface, or cooking with it
- Rushing the cool-down reduces bonding and shortens the repair's lifespan
Step 5: Test and Validate the Repair
Run a simple performance test before committing the pan back to regular use:
- Heat the pan over medium heat with a small amount of oil
- Cook a single egg — no butter, no extra oil
- Watch for sticking, uneven release, or any visible flaking of repair material
If the egg releases cleanly, the repair worked. Monitor the pan over the next several uses for signs of re-sticking or coating separation.
If sticking returns immediately, or if the repair material itself starts peeling, the damage is beyond DIY repair. Professional recoating or replacement is the next step.
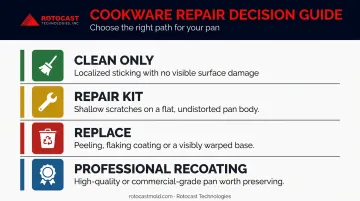
When to Fix vs. Replace Your Teflon Coating
This decision comes down to damage severity, pan age, and construction quality—not just surface appearance.
Fix it (cleaning only) if:
- Sticking is localized and the surface has no visible physical damage
- The pan is relatively new and well-constructed
- A thorough cleaning with baking soda paste resolves the issue
Fix it temporarily (repair kit) if:
- There are 1–2 shallow scratches without any peeling
- The pan body is flat and undamaged
- You're willing to monitor performance closely after application
Replace it if:
- The coating is peeling, flaking, or chipping—these particles can enter food
- Deep gouges expose the metal substrate
- The pan body is warped
Consider professional recoating if:
- The pan is a high-quality commercial or industrial-grade piece worth preserving
- Industrial PTFE recoating services strip the old layer and apply a fresh coating; costs typically run $30–$100+ depending on pan size and provider
- For most standard home pans, this cost often matches or exceeds what a replacement pan would cost
How to Prevent Future Teflon Coating Damage
Preventing coating damage costs far less than repairing it. Three habits cause most failures:
Use the right utensils. Always cook with wood, silicone, or plastic tools. Metal spatulas and spoons are the primary cause of surface scoring.
Control heat. PTFE begins to degrade at approximately 500°F (260°C), releasing polymer fumes that can be harmful in poorly ventilated spaces. Cook on low to medium heat—non-stick surfaces don't need high heat to perform well.
Store and clean carefully:
- Hand wash with a soft sponge; skip the dishwasher and harsh detergents, which accelerate coating breakdown
- Dry pans thoroughly before stacking to prevent moisture trapped under coatings
- Place a cloth or paper towel between stacked pans to prevent abrasion
Frequently Asked Questions
Can you get Teflon pans recoated?
Professional recoating services exist, but they're primarily oriented toward commercial and industrial cookware. For most home pans, the cost typically exceeds what you'd pay for a new pan—making replacement the more practical option for everyday cookware.
What should you do with a peeling Teflon pan?
Stop using it for cooking immediately. Peeling PTFE cannot be safely repaired, and ingesting flakes—while not acutely toxic—is not ideal. Repurpose the pan for non-food uses like paint mixing or arts and crafts, or dispose of it responsibly.
How many years does a Teflon pan last?
With proper care, most non-stick pans last 3 to 5 years. Heavy daily use, high heat exposure, metal utensils, and dishwasher cleaning can cut that lifespan significantly shorter.
Is Teflon coating safe?
Modern PTFE coatings no longer contain PFOA, which was phased out under the EPA's PFOA Stewardship Program by 2015. Intact Teflon cookware is generally considered safe—but overheated or damaged coatings present real risks and should not be used.
Can you coat aluminum pans with Teflon?
Yes. Aluminum is one of the most common substrates for PTFE coating due to its lightweight and thermal conductivity. Professional industrial coating services can apply PTFE to aluminum with proper surface preparation—including precision components like rotational molds—yielding durable, high-adhesion results.