The problem isn't usually catastrophic failure. It's neglect. A hairline crack that gets ignored becomes a structural repair. A worn parting line that produces minor flash eventually causes consistent part rejects. Small issues compound until a mold that could have been saved for a few hundred dollars requires full replacement.
This guide covers the full picture: what damage to look for, how to choose the right repair method, and the maintenance practices that keep aluminum rotational molds producing quality parts for years.
Key Takeaways
- Aluminum rotational molds face four main damage types: thermal fatigue cracking, porosity/pitting, parting line wear, and warping
- TIG welding with 4043 filler rod handles structural repairs
- Cold filler compounds address surface defects like porosity and minor pitting
- Surface prep (solvent clean first, then stainless wire brush) is the most critical step — contamination kills weld repairs
- Replace when repair costs approach or exceed 50% of new mold cost, or fatigue cracking is widespread
- Proactive maintenance reduces defects and downtime dramatically compared to reactive repair
Why Aluminum Mold Repair and Maintenance Matter
Rotational molds aren't a commodity line item. A small custom mold might run around $4,000; a 50-gallon trash can mold can reach $20,000 with roughly $1,000 per year in maintenance costs; larger production tooling for industrial applications can reach $150,000 or more, according to industry examples from Roto Dynamics and Regency Plastics. That's a capital investment worth protecting.
Damaged molds drive costs in ways that compound quickly. The numbers make the case:
- ARM's Dr. Nick Henwood found that one operation running a 4% average scrap rate was losing well over $200,000 annually — much of it tied directly to mold condition
- NIST research on manufacturing machinery found facilities relying on reactive maintenance had 16 times more defects than those with proactive programs
- Preventive maintenance saves 12–18% in maintenance costs versus reactive approaches, with 2.4 times fewer lost-sale delays
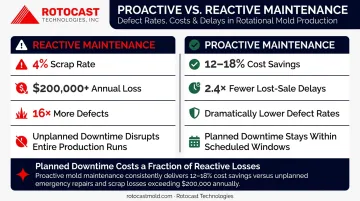
For rotomolders, the implication is straightforward: a TIG repair scheduled during planned downtime costs a fraction of what a mid-run failure costs in scrapped parts, unplanned labor, and missed shipments. Maintenance decisions made at the mold level ripple through the entire production operation.
Common Types of Aluminum Mold Damage
Rotational molds face stresses that most tooling doesn't. Oven temperatures routinely reach 400–850°F (200–454°C), according to LyondellBasell's rotomolding guide, and molds cycle through those temperatures continuously. Add mechanical handling, clamping forces, and chemical exposure from release agents, and the damage patterns become predictable — which makes them preventable.
Surface Cracks and Fatigue Cracking
Thermal fatigue is the most common damage type in rotational molds. Each heat-cool cycle causes the aluminum to expand and contract. Over hundreds or thousands of cycles, that repeated stress initiates cracks — typically at stress concentration points like inside corners, vent pin holes, and parting line edges.
Research on A356-family aluminum composites found crack initiation at notch tips after roughly 150 thermal cycles between ambient temperature and 250°C. In rotomolding, where oven temperatures routinely exceed that threshold, the mechanism is directly applicable.
Porosity and Pit Defects
Porosity — air or gas pockets trapped during casting — can remain dormant, then surface as pitting on the cavity face as the mold wears. When pits appear on the cavity surface, they show up as blemishes or holes on finished parts.
LyondellBasell's rotomolding guide explicitly identifies "porosity in cast aluminum mold" as a cause of holes in molded parts. Denser castings resist this because fewer voids exist to migrate to the surface — which is why casting alloy grade and foundry process quality affect not just initial performance, but how well a mold responds to repair over its lifetime.
Parting Line and Flange Wear
The parting line — where mold halves meet — takes a beating. Every open-close-clamp cycle creates mechanical wear on the flange faces. When flanges deteriorate, they gap during production, producing flash on finished parts and causing wall thickness inconsistencies.
LyondellBasell's troubleshooting guidance links dirty flanges, uneven clamp pressure, and damaged parting lines to flash and part quality problems. Cleaning, re-mating, and adjusting clamp pressure often resolves the issue — but persistent flash is a reliable signal that the flanges need re-facing.
Warping and Dimensional Distortion
Uneven heating or cooling, drop impacts, and improper storage — particularly molds stored under load — can all cause mold halves to warp. Even slight warping creates parting line gaps that resist consistent sealing, and the resulting dimensional drift can't be dialed out through process adjustments alone.
Vent Pin and Insert Damage
Vent pins regulate internal pressure during rotomolding — they're small but critical. Heat cycling causes them to gall, seize, or degrade over time, and stripped or stuck vent pins can produce surface defects on parts even when the rest of the mold cavity is in good condition. Threaded inserts are similarly vulnerable to heat-related degradation and mechanical wear.
Aluminum Mold Repair Methods: Choosing the Right Approach
The repair method has to match the damage. Using the wrong technique — particularly applying a surface filler to a structural crack, or welding over a contaminated surface — creates a repair that fails quickly and can introduce new stress into the aluminum.
TIG Welding (GTAW) for Structural Repairs
TIG welding is the standard approach for cracks, broken flanges, and significant material loss. For molds cast from A356 or A356.2 aluminum (the AlSiMg family), 4043 filler rod is the correct choice.
Hobart's filler selection chart confirms 4043/4943 for 356.0, A356.0, and A357.0 alloys — 4043 specifically offers low hot-cracking sensitivity and good fluidity for repair work.
The preparation sequence matters:
- Degrease with acetone (solvent cleaning first)
- Wire brush with a stainless steel brush used only on aluminum
- V-groove the crack rather than welding over it
- Weld inside surface first for full penetration, then weld the opposite side
- Allow slow, controlled cooling — no quenching
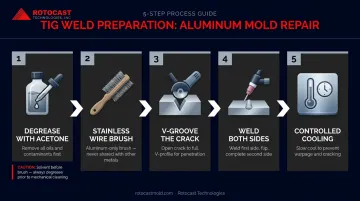
Miller's welding guidance warns that brushing before solvent cleaning can embed hydrocarbons into the aluminum surface, contaminating the weld. Lincoln Electric confirms solvent-first, then stainless brush as the industry standard sequence.
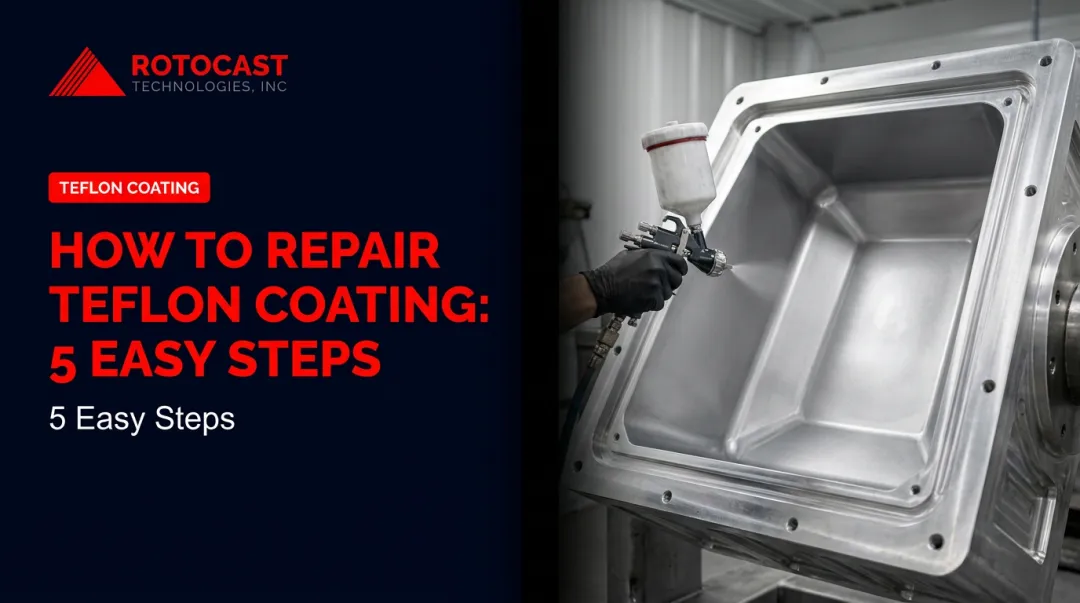
Cold Metal Repair Compounds
For surface defects, shallow pits, and cosmetic repairs, aluminum-compatible cold filler compounds (such as Devcon Aluminum Putty F or Belzona 1111) offer a practical alternative when heat-based welding isn't suitable.
These compounds create no heat-affected zone, carry no distortion risk, and can be machined and color-matched after curing.
Important limitation: cold repair compounds have temperature resistance limits (Devcon Aluminum Putty F is rated to 250°F/121°C) and are not structural repairs. They work well for cavity surface restoration but should not be used on load-bearing areas, flanges, or structural cracks.
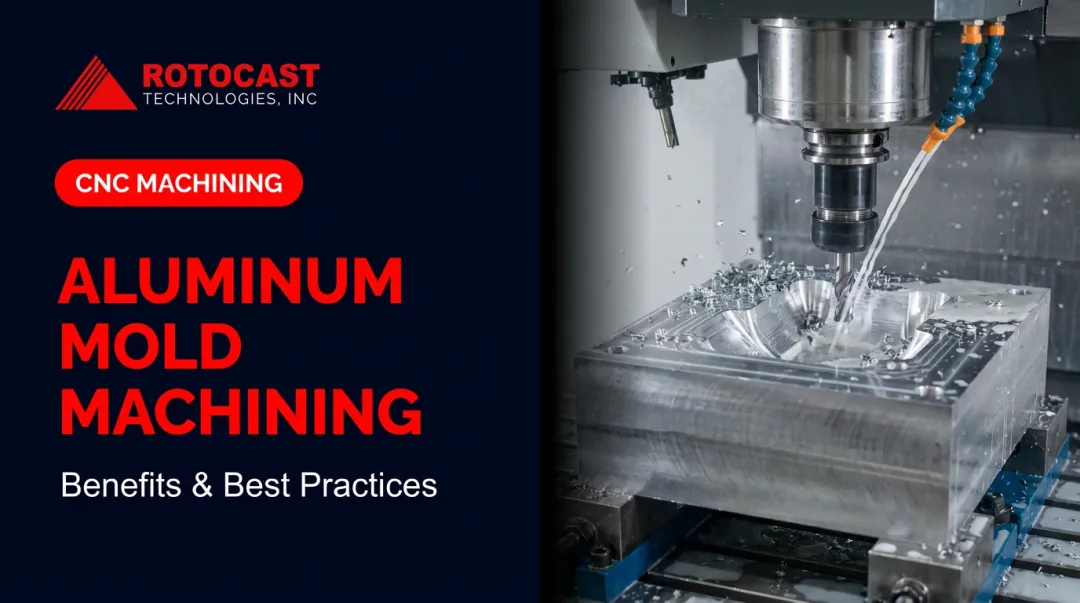
Machining and Re-Cutting
Minor dimensional distortions and worn parting line faces can often be corrected by precision machining — re-facing flanges, re-cutting parting lines, or re-boring insert pockets. This requires CNC access and either accurate original dimensions or CAD files. Shops without in-house machining capability will need to send the mold to a facility with CNC equipment and familiarity with the original mold specifications.
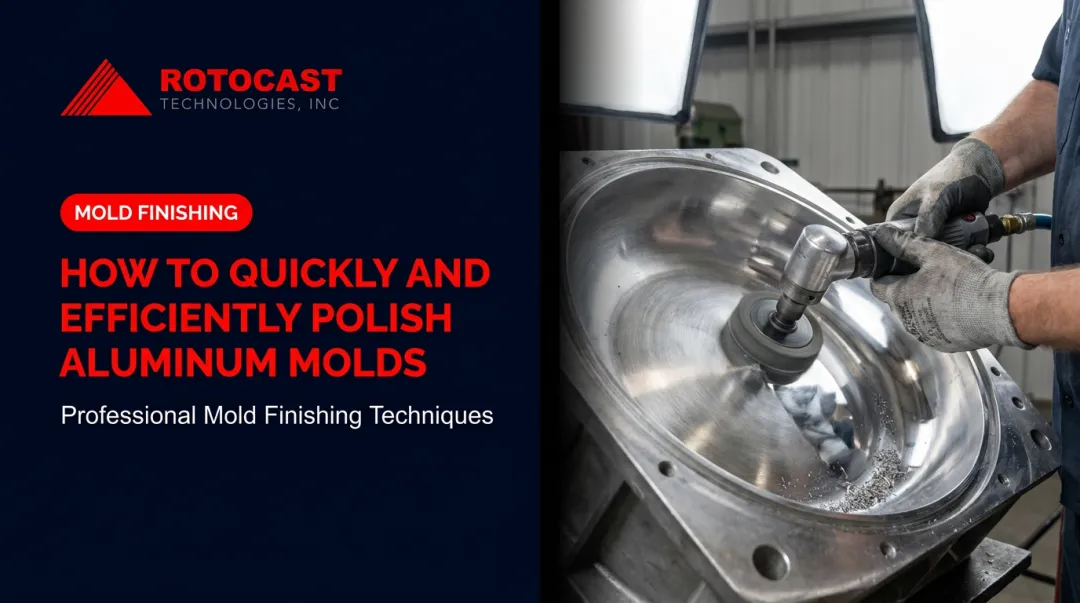
Surface Resurfacing and Polishing
Light scratches, minor pitting, and release agent buildup that affects surface texture can be addressed through controlled polishing without changing mold dimensions. The cavity finish directly determines part surface quality, so restoring it to the original specification matters. Finish options include:
- Hand sanding for light scratches and minor surface irregularities
- Shot peening to restore uniform texture after pitting or abrasion
- Mirror polishing for cavity surfaces requiring high-gloss part finishes
This is a production maintenance task, not just cosmetic work.
Vent Pin and Insert Replacement
Replace damaged vent pins and threaded inserts — don't try to repair them. These components are low-cost relative to the downtime they cause when they fail mid-run. Keeping a stock of common vent pin sizes on hand eliminates most of the delay when replacement is needed.
Best Practices for Effective Aluminum Mold Repair
Getting the repair right requires more than the correct technique. These practices separate repairs that hold through thousands more cycles from ones that fail within a production run.
Surface preparation before anything else. Mold release agents penetrate aluminum surfaces and contaminate weld zones. Every repair area must be fully cleaned — acetone degreasing first, then stainless wire brushing (dedicated to aluminum only). Skipping or rushing this step is the single most common cause of failed weld repairs on aluminum.
V-groove crack preparation. Never bead over a crack. The correct method:
- Grind a V-groove along the full length of the crack on both faces
- Weld each side for full penetration
- Grind flush after cooling
- Inspect dimensionally before returning to production
Controlled cooling after welding. Allow welded molds to cool slowly at ambient temperature. Quenching creates thermal shock that can re-crack the weld zone or introduce new stress fractures in adjacent material. No fixed preheat temperature applies universally — follow the filler supplier's guidance or a qualified welding engineer's procedure for the specific alloy.
Document every repair. Each repair should be logged with:
- Mold ID and serial number
- Date of repair
- Damage type and location
- Repair method and filler used
- Technician name
- Post-repair dimensional check results
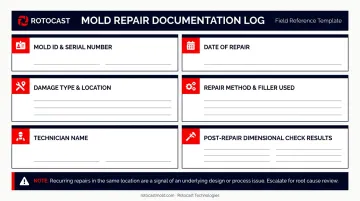
Repair logs matter more than most shops realize. They reveal patterns — a mold that cracks in the same location three times has a design or process issue that needs addressing, not just repeated welding.
Post-repair inspection before production. Visual check, parting line dimensional verification, and a test run to confirm part quality should all happen before the mold returns to full production. A repair that passes visual inspection but produces dimensional drift on the first parts is not a complete repair.
For molders managing multiple tools, these practices only go so far without the right repair partner. A mold manufacturer with in-house foundry and machining capabilities brings a different level of capability to repair work than a general fabrication shop.
Rotocast Technologies, operating out of Akron, Ohio since 1956, offers mold repair and refurbishment through their machine shop. With a workforce averaging 16 years of specialty casting and mold manufacturing experience, their team understands aluminum mold behavior at the casting level, not just the surface.
Signs Your Mold Needs Repair — and When to Replace It
Repair Indicators
Stop production and inspect immediately if you see:
- Visible cracks or fractures on the cavity surface or flanges
- Sudden increase in parting line flash that process adjustment can't eliminate
- Pitting or texture changes appearing on finished parts
- Vent pins that are difficult to operate, stuck, or leaking
- Part dimensional drift that can't be traced to resin, temperature, or cycle time changes
These symptoms don't improve on their own. Running a damaged mold accelerates the damage and adds reject costs on top of the repair bill.
The Repair vs. Replace Decision
Repair is the right call when:
- Damage is localized to one area
- The overall mold structure is sound
- Repair cost is well below replacement cost
Replacement becomes necessary when:
- Fatigue cracking is widespread or recurring in the same location despite repeated repairs
- The mold is dimensionally beyond what machining can restore
- Cumulative repair costs are approaching replacement cost
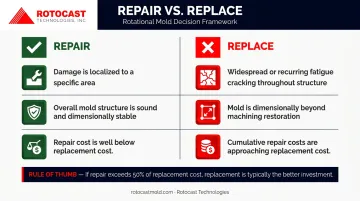
A general industry rule of thumb: if repair cost exceeds 50% of replacement cost, replacement is typically the better investment — though every situation depends on remaining mold life and production volume.
When replacement is the right decision, the quality of the new mold directly determines how long the next service life will be. Wall thickness uniformity, casting density, and parting line precision aren't just quality markers — they're durability factors that compound over thousands of cycles.
Rotocast Technologies' casting process uses A356.2 grade aluminum, which offers greater elongation, higher strength, and higher ductility than standard 356.0, with strict chemical limits ensuring consistent quality. Molds built to those specifications start with fewer defects and hold up longer between repairs.
Conclusion
Aluminum mold repair isn't complicated, but it is skill- and process-dependent. The difference between a repair that extends a mold's life by years and one that fails in the next production cycle usually comes down to preparation, correct technique selection, and accurate documentation — not the complexity of the damage itself.
Catching damage early, paired with a consistent maintenance log, remains the most cost-effective way to protect a rotational mold investment. Molds that stay in production longest share one trait: damage gets addressed before it compounds into a full rebuild or replacement.
If your mold has moved beyond routine maintenance into structural repair or refurbishment, Rotocast Technologies has handled that work for rotational molders across North America since 1956 — reach out at sales@rotocastmold.com or call 330-203-2335 to discuss your situation.
Frequently Asked Questions
Is there a filler for aluminum?
Yes. For structural TIG repairs on A356-family aluminum mold castings, 4043 filler rod is the industry standard — it offers low hot-cracking sensitivity and good fluidity. Cold-applied compounds like Devcon Aluminum Putty F or Belzona 1111 handle surface pitting but are not appropriate for structural or load-bearing repairs.
Can mold damage be repaired?
Most aluminum mold damage — including cracks, surface pitting, parting line wear, and minor warping — can be successfully repaired using TIG welding, precision machining, or filler compounds. The key is early detection and matching the repair method to the damage type and severity.
How long do aluminum molds last?
Aluminum rotational molds can last many years or decades with proper maintenance. Industry guidelines suggest soft-metal rotomolding tools may need refurbishment after roughly 3,000 molding cycles, though actual service life depends on production volume, operating temperatures, and original casting quality.
What is the best way to repair a cracked aluminum mold?
Clean the area with acetone, then wire brush with a dedicated stainless brush. Grind a V-groove along the full crack length, then weld both sides with 4043 filler using TIG. Allow slow controlled cooling, grind flush, and verify dimensions before returning to production. Never weld directly over an unprepared crack.
How often should aluminum rotational molds be inspected?
A visual inspection after every production run is good practice. A more detailed check — parting line condition, vent pin function, cavity surface — should happen monthly or at a set cycle interval. A full dimensional inspection is warranted annually or after any significant repair.
How do I prevent aluminum mold damage from thermal cycling?
Avoid thermal shock by preheating molds gradually before production and never quenching after runs. Ensure oven temperature distribution is even across the mold surface. Molds with uniform wall thickness — typically ¼" to 3/8" — transfer heat more evenly, reducing the localized stress that initiates fatigue cracks over time.