The challenge is that most guides make this process look simpler than it is. Results vary dramatically based on surface condition, alloy type, grit progression, and compound selection. Skip any stage and you'll get a surface that looks shiny under certain lighting but won't hold up as a true mirror under direct inspection.
This guide covers the exact steps, required materials, critical variables, common mistakes, and how to fix the most frequent problems.
Key Takeaways
- Polish aluminum in order: clean → sand (progressive grits) → cutting compound → finishing compound → seal
- Sanding is non-negotiable — skipping it leaves micro-roughness that diffuses light instead of reflecting it
- Use the full grit progression (400 → 600 → 800 → 1200 → 2000 → 3000) — skipping grits leaves haze that survives to the final finish
- Test for clear coat or anodizing before starting; both must be removed before polishing can work
- Seal immediately after polishing; bare aluminum begins forming oxide within hours of air exposure
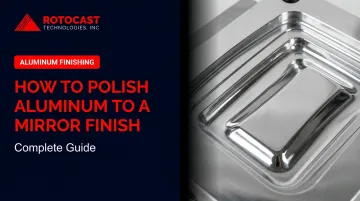
How to Polish Aluminum to a Mirror Finish: Step-by-Step
Step 1: Inspect and Clean the Aluminum Surface
Before touching an abrasive, confirm what you're working with.
Check for surface coatings first. Apply a small amount of polish to an inconspicuous spot and rub with a white cloth. If the cloth doesn't turn black, a clear coat is present and must be stripped before you can polish bare aluminum. Chemical strippers like aircraft remover handle clear coats effectively: apply, wait 5–15 minutes for the finish to blister, then remove with a plastic scraper. Anodizing requires chemical stripping or aggressive sanding and cannot be polished through.
Then clean the surface thoroughly:
- Remove grease, brake dust, and road grime with a degreaser or dish soap and warm water
- For heavily oxidized surfaces, use a commercial aluminum pre-cleaner
- Rinse completely and dry with a microfiber cloth
Safety first: Have a respirator, safety glasses, and gloves on hand before you start. OSHA identifies aluminum grinding and polishing as creating combustible dust hazards — this applies to buffing operations too, not just grinding.
Step 2: Sand the Aluminum — Coarse to Fine
This is where the mirror finish is built or broken. Buffing compounds alone cannot remove the micro-roughness that causes light diffusion. Only progressive sanding can.
Choose your starting grit based on surface condition:
| Surface Condition | Starting Grit |
|---|---|
| Deep scratches, heavy oxidation, cast texture | 220–320 |
| Moderate scratches or oxidation | 320–400 |
| Already relatively smooth | 400 |
The proven sequence: 400 → 600 → 800 → 1200 → 2000 → 3000
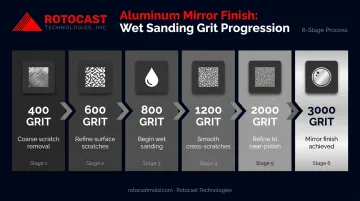
Work in straight, overlapping strokes. Alternate direction between grits so you can see when the previous scratch pattern has been fully erased. Starting at 800 grit, wet sand using clean water as lubricant, keeping the surface visibly wet and rinsing between grits.
Critical rule: After each grit, wipe the surface clean and inspect under direct light. Visible scratches mean you haven't finished that stage. Do not advance until the surface looks consistent and haze-free. According to Red Label Abrasives, skipping more than one grit stage is a primary cause of persistent haze because each stage exists to erase the marks left by the previous one.
Do not advance to buffing until the surface looks uniformly smooth at 2000–3000 grit.
Step 3: Apply Cutting Compound with a Buffing Wheel
The cutting stage removes fine sanding marks and starts developing a dull shine.
- Wheel type: Sisal or spiral-sewn wool — aggressive enough to cut effectively
- Compound: Black emery (coarsest, for scratches and heavy marks) or brown Tripoli (general-purpose cutting for soft metals including aluminum)
- Apply compound to the wheel, not directly to the aluminum
- Work in sections — don't let compound dry on the surface
Speed matters. According to manufacturer guidance from Renegade Products, beginners should start around 3,500 RPM for cut/color work, dropping to around 1,800 RPM for the final show-shine stage. Keep the buffer moving constantly: aluminum conducts heat quickly and is soft enough to warp or discolor under a stationary buffer. Use a buffing wheel rake periodically to clear loaded compound from the wheel.
Tool selection by surface type:
- Dual-action (DA) polisher: Works for smooth, flat aluminum without significant damage
- Rotary buffer: Required for heavily oxidized or pitted surfaces that need serious cutting power
Step 4: Refine with Finishing Compound
Switch to a clean, softer wheel — cotton or foam — and a finer compound.
White rouge is the well-supported choice for aluminum finishing: it eliminates micro-scratches from the cutting stage and develops the deep reflective shine you're after. (Green rouge is sometimes used as a final step on aluminum, though its primary use is stainless steel — if you use it, verify it's appropriate for your alloy.)
Never mix compounds on the same wheel. Cross-contamination reintroduces abrasion from the previous cutting stage. Dedicate one wheel per compound type.
Buff the entire surface in overlapping passes. Inspect under multiple lighting angles — swirl marks, haze, or cloudiness visible from any angle means another pass is needed. Repeat until the surface is uniformly reflective.
Step 5: Seal and Protect the Polished Surface
Bare aluminum begins forming aluminum oxide within hours of air exposure. Left unprotected, a mirror finish degrades quickly.
Protection options by use case:
| Option | Durability | Best For |
|---|---|---|
| Carnauba wax | Short-term (weeks) | Show pieces, light indoor use |
| Aluminum-specific sealant (e.g., Everbrite) | 5–10 years depending on exposure | Automotive, daily-use parts |
| Aluminum protectant (e.g., Sharkhide) | 1–3 years; 1–2 years in saltwater | Marine, harsh environments |
| Ceramic coating (e.g., Starke) | Up to 3 years | Saltwater vessels, high-exposure parts |
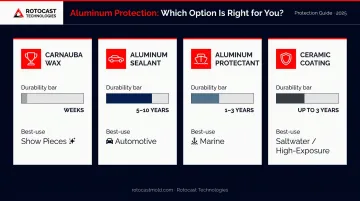
For marine or road-salt environments, choose an aluminum-specific protectant or ceramic coating over generic wax. Apply immediately after the final buffing pass, and reapply on schedule — rinse and dry after any exposure to salt, chemicals, or standing water.
Key Variables That Affect Your Mirror Finish Results
Technique matters, but these variables often determine whether results are acceptable or professional-grade.
Starting Surface Quality
The condition of aluminum before polishing dictates how many sanding stages you'll need, and in some cases, whether a true mirror finish is achievable at all. Heavily pitted surfaces, deep casting porosity, or severe orange peel texture require significantly more preparation than machined or pre-finished surfaces.
Casting alloy selection plays a direct role here. A356.2 aluminum, for instance, has stricter chemical limits, greater elongation, and higher ductility than standard 356.0 — properties that produce denser, higher-integrity surfaces from the start. That surface quality translates directly into fewer correction stages before polishing.
Cast surfaces with significant porosity may resist a true mirror finish regardless of polishing effort. Know your starting condition before committing to a full polishing sequence.
Grit Progression Discipline
Jumping grits (going from 400 to 1200 without intermediate steps) leaves deep scratch patterns that finer abrasives cannot fully remove. These scratches carry through to the buffing stage and appear as cloudiness or streaking under direct light.
Every grit stage exists for one purpose: to erase the marks left by the previous grit. The sequence isn't conservative — it's the minimum required work.
Compound and Pad Matching
Wrong combinations waste time and produce poor results:
- Cutting stage: Wool or sisal wheel + emery or Tripoli compound
- Finishing stage: Cotton or foam wheel + white rouge
- One pad per compound — no exceptions
Applying a finishing compound over deep sanding marks won't remove them — it lacks the cutting action to do so.
Heat Management During Buffing
Aluminum's thermal conductivity (around 167 W/m·K for 6061-T6) means heat moves fast. Its low hardness rating makes it vulnerable to smearing or discoloration when a buffer dwells too long in one spot.
Keep the buffer moving, use moderate speed settings, and watch the pad for compound buildup — a loaded pad increases friction and heat.
Common Mistakes When Polishing Aluminum
Most failed finishes trace back to the same handful of errors. Avoid these before you start:
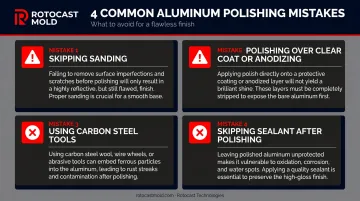
- Polishing without sanding first produces a shiny surface, not a reflective one — compounds can't remove the micro-roughness that causes light diffusion.
- Polishing over clear coat or anodizing wastes time and materials, and can permanently damage the surface. Always do the rag test before committing.
- Standard steel wool or carbon steel wire brushes embed ferrous particles into aluminum, causing rust-like staining over time. Use aluminum-compatible abrasives and stainless steel tools only.
- Leaving freshly polished aluminum exposed lets oxidation begin within days. Apply a sealant immediately — without it, the polishing effort is wasted.
Troubleshooting Issues While Polishing Aluminum
Persistent Haze or Cloudiness After Buffing
Likely cause: Sanding marks from a coarser grit weren't fully removed before advancing; or compound residue has embedded in the surface grain.
Fix: Step back to the last grit that fully resolved the surface and repeat through finer grits. Clean thoroughly before reapplying compound. For cloudiness embedded in the grain, a mild phosphoric acid wash followed by re-buffing may restore clarity — wear acid-resistant gloves and eye protection when handling it.
Swirl Marks Visible After Machine Buffing
Likely cause: Pad or compound too aggressive for the finishing stage; buffer speed too high; cross-contamination between compounds.
Fix: Switch to a clean foam or microfiber pad and a finer compound. Reduce speed. Work in straight overlapping passes rather than circular motions. Inspect all pads for contamination before use.
Black Residue Accumulating on the Surface
Likely cause: Normal. The black material is compound mixed with fine aluminum particles and oxidation being lifted from the surface.
Fix: Wipe away promptly with a clean microfiber cloth. For residue stuck in pits:
- Apply mineral spirits with a soft brush to loosen it
- Wipe clean with a fresh cloth
- Repolish the area
Severe pitting that traps residue consistently may require additional sanding before buffing is effective.
Water Spots Appearing After Rinsing
Likely cause: Mineral deposits from tap water drying on the surface before being wiped away. Common in hard water areas.
Fix: Dry all rinsed surfaces immediately with a chamois or microfiber cloth — don't let rinse water sit. For existing spots, use a dedicated water spot remover such as Meguiar's Water Spot Remover. In hard water areas, a final rinse with distilled water before drying prevents spots from forming in the first place.
Conclusion
Polishing aluminum to a true mirror finish is disciplined work, not complicated work. The failures almost always trace back to the same places: insufficient sanding, skipped grit steps, or an unprotected result left to oxidize. Get the sequence right, and the right product almost picks itself.
Starting surface quality matters most, but compound selection and post-polish protection determine whether that finish lasts. Anyone willing to work through the full progression — clean, sand every grit, cut with the right compound and wheel, refine, then seal immediately — can achieve a reflective, durable finish on bare aluminum.
Frequently Asked Questions
Frequently Asked Questions
Can aluminum be polished to a mirror finish?
Yes. Most bare aluminum can be polished to a true mirror finish with the correct grit progression and buffing compounds. Clear-coated or anodized aluminum must be stripped first. Heavily pitted or corroded surfaces require more preparation but can still achieve high-reflectivity results.
How do you machine a mirror finish on aluminum?
Start with fine turning or milling passes to minimize surface roughness. Follow with progressive wet sanding from 400 up to 3000 grit, then finish with a cutting compound and white rouge. A lower starting Ra from the machining step significantly reduces the sanding work required.
Can alloy wheels be polished to a mirror finish?
Yes, but factory clear coat must be removed first. Eastwood confirms most OEM wheels have clear coat or paint that must be stripped before bare-metal polishing. The process then follows the same clean → sand → compound → seal sequence, with extra attention to tight corners and spokes.
What are the most common mistakes when polishing aluminum?
Skipping the sanding stage, jumping grit sizes, polishing over clear coats without removal, using carbon steel tools that embed iron particles, and neglecting to seal the finished surface. Each mistake either blocks a true mirror finish or shortens how long it lasts.
How long does it take to polish aluminum to a mirror finish?
Small, well-prepared parts may take 1–2 hours. Heavily oxidized or large surfaces can take several hours or multiple sessions. The sanding stage consistently takes the most time and should not be rushed: it determines whether the buffing stage can succeed at all.
How do I keep polished aluminum from oxidizing?
Apply a protective coating immediately after polishing — aluminum-specific sealants or protectants for daily-use parts, or a ceramic coating for maximum durability in harsh or marine environments. Clean and reapply protection on a regular schedule based on your exposure conditions.