Introduction
Most rotational molds are cast or machined aluminum — and the interior surface of that mold is what every finished part will look like. Every scratch, swirl mark, or orange-peel texture in the cavity transfers directly to the product surface. This isn't a cosmetic concern. It affects part release, resin flow, and how long the mold holds up in production.
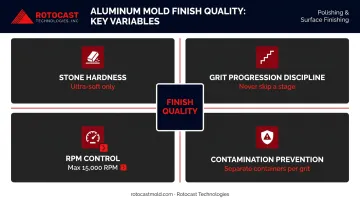
Polishing aluminum follows a logical progression, but results vary widely based on four variables: stone selection, grit discipline, RPM control, and contamination prevention. Each one matters — overlook any of them and the others won't make up the difference.
This guide covers the complete polishing sequence for aluminum molds, from removing milling marks with coarse stones through diamond compound stages to final paste polish. You'll find the materials, critical variables, and common mistakes that separate a clean mirror finish from a cavity that needs to be redone.
Key Takeaways
- Aluminum smears under hard abrasives — use ultra-soft stones with liberal stoning oil at every stage
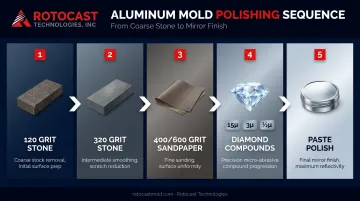
- Polishing sequence: 120 → 320 grit stones, 400/600 sandpaper, diamond compounds (15µ down to ½µ), then paste polish
- Never skip a grit stage; contamination between grits is the most common cause of failed finishes
- Keep RPM at or below 15,000 during diamond polishing to avoid orange-peel deformation
- Better incoming surface quality from machining means less stock removal in Stage 1 — and a faster path to final polish
Why Polishing Aluminum Molds Is Different from Steel
Hardness and Smearing Behavior
Standard mold polishing techniques developed for tool steel don't translate to aluminum. The hardness gap is significant: A356.0-T6 sand-cast aluminum sits at 70–105 HB, while P20 plastic mold steel ranges from 285–340 HB. That's roughly a 3–4x difference in hardness.
Under abrasive pressure, aluminum doesn't shear cleanly the way harder steel does. Instead, it smears: the ductile material deforms and clogs the abrasive surface rather than being cut away. Standard polishing stones load up almost immediately on aluminum and stop cutting entirely.
Ultra-soft, vitrified-bond stones are designed specifically for this behavior, with fast breakdown rates that continuously expose fresh abrasive before loading occurs.
Cast vs. Machined Starting Surfaces
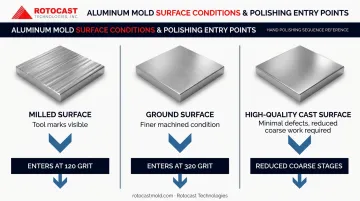
The starting surface condition determines your entry point into the polishing sequence:
- Milled aluminum surfaces — visible tool marks require a 120 grit coarse stone to begin
- Ground surfaces — finer starting condition allows beginning at 320 grit
- High-quality cast mold surfaces — specialist foundries producing rotomolding-specific castings can deliver interior surfaces that require less coarse stone work
Rotocast Technologies uses A356.2 grade aluminum alloy, a higher-purity variant with lower impurities, greater elongation, and higher ductility than standard 356.0. Their foundrymen have refined the process of pouring thin-walled castings specifically for rotational molding. Dense, defect-free castings minimize the porosity and surface irregularities that make early stoning stages more labor-intensive.
Why the Mold Surface Matters to the Final Part
That casting quality has a direct downstream consequence. As Roto Dynamics notes, part surface finish is determined entirely by mold surface texture. A well-polished cavity delivers measurable production benefits:
- Smoother surface finish on finished parts
- Improved resin release during demolding
- Reduced material sticking and cycle-time delays
- Extended mold service life
Polishing isn't a cosmetic step — it directly affects part quality and how long the mold stays in production.
Tools and Materials You'll Need
Equipment and Abrasives
Stones and sandpaper:
- Ultra-soft abrasive stones — 120 grit (for milled surfaces) and 320 grit
- Aluminum oxide sandpaper — 400 grit and 600 grit (900 grit optional intermediate)
- Stoning oil for pre-soaking and surface re-wetting throughout
Diamond compounds:
- 15 micron / blue — first diamond stage
- 3 micron / yellow — intermediate refinement
- ½ micron / ivory — final diamond stage
Finishing:
- All-metal paste polish (Simichrome or equivalent) — no abrasive, for final residue removal
Application tools:
- Lapping sticks or rubber/foam holders (AbraDisc style) for contoured surfaces
- Cup brushes for diamond compound application
- Flexible drive handpiece or power polisher for large mold cavities
- Separate labeled containers for each grit's stones, papers, and applicators — cross-contamination between grits will undo your progress
Safety and Workspace Requirements
Aluminum polishing generates fine metallic dust that poses a respiratory hazard. OSHA sets aluminum metal permissible exposure limits at 15 mg/m³ total dust and 5 mg/m³ respirable fraction as an 8-hour TWA.
Required PPE and workspace setup:
- Respirator or dust mask rated for fine metallic particulate
- Safety glasses
- Gloves
- Well-ventilated workspace with adequate extraction
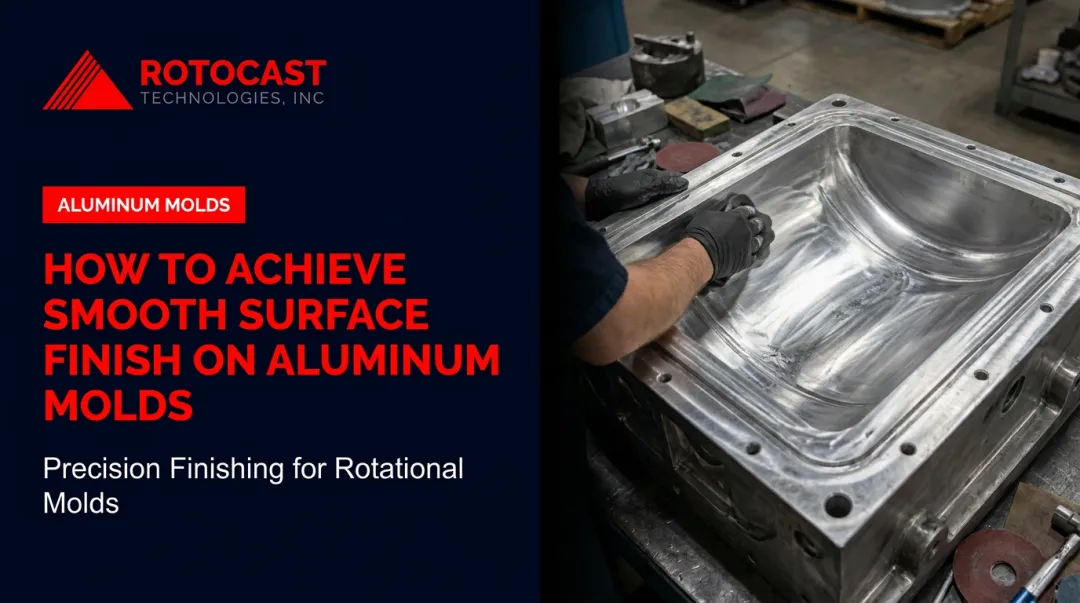
How to Polish an Aluminum Mold: Step-by-Step
Step 1: Remove Milling or Tool Marks (120 Grit Ultra-Soft Stone)
Milled surfaces start here. Ground surfaces can skip to Step 2.
Before you begin: Soak ultra-soft stones in stoning oil for 10–15 minutes. Dry stones load immediately on aluminum. Pre-soaking saturates the bond and extends cutting life between re-wetting.
Technique:
- Apply stoning oil to the mold surface
- Work in approximately 1–2 square inch sections using a criss-cross pattern
- Re-wet both the stone and surface every few passes — never let either run dry
- Continue until all milling marks are gone across the entire cavity
Clean the mold surface thoroughly before advancing. Any 120 grit residue carried into the next stage will create scratches that undermine hours of work.
Step 2: Refine with 320 Grit Ultra-Soft Stone
Switch to a 320 grit ultra-soft stone using the same liberal stoning oil approach. Work perpendicular to the direction used in Step 1. This makes it easy to confirm all 120 grit scratch marks are gone. When the coarser cross-hatch pattern disappears, the surface is ready. Clean the mold and all tools before moving forward.
Step 3: Sand to Pre-Polish Smoothness (400 → 600 Grit)
Progress from 400 grit aluminum oxide sandpaper to 600 grit, applying stoning oil throughout. If 600 grit hasn't fully eliminated stone marks after a thorough pass, add a 900 grit intermediate stage before moving to diamond compounds.
Cleanliness between steps determines the final outcome. A single coarser particle contaminating a fine-grit stage creates scratches that only appear after the final polish, forcing a full return to sandpaper.
Step 4: Polish with Diamond Compounds (15µ → 3µ → ½µ)
Start with 15 micron (blue) diamond compound:
- Apply compound to the mold surface with diamond lapping oil
- Use a cup brush at a maximum of 15,000 RPM
- Work in a criss-cross pattern with light, consistent hand pressure
- Reduce hand pressure near the end of each stage to minimize swirl marks
Why the RPM limit matters: Higher speeds fling compound off the surface by centrifugal force, wasting expensive material. Higher speeds fling compound off the surface by centrifugal force, wasting expensive material. The heat generated also causes aluminum to deform into an orange-peel texture that requires sanding out to correct.
Polish a small test section first. Confirm all 600 grit sandpaper marks are gone before committing to the full surface. Then repeat with 3 micron (yellow), and ½ micron (ivory) for progressively finer results.
Step 5: Final Paste Polish and Surface Protection
Apply an all-metal paste polish (such as Simichrome) on clean tissue. This removes the cloudy residue left by brush application and restores full reflectivity.
For each additional diamond stage added (3µ, then ½µ), apply paste polish after each one before moving to the next.
After polishing: Protect the finished surface from re-oxidation during storage and between production runs. NIST research shows aluminum reflectivity decreases rapidly as the surface tarnishes. Use a mold-safe protective coating or wrap the cavity to exclude air and moisture during storage.
Key Variables That Determine Your Finish Quality
Four variables control whether your aluminum mold finishes clean or requires a full restart. Understand each one before you start cutting.
Stone Hardness and Type
Aluminum requires ultra-soft stones — standard stones designed for steel are simply too hard. Under abrasive pressure, aluminum's ductility causes it to smear and clog the stone face rather than abrade cleanly.
What happens with the wrong stone: rapid loading within the first few passes, streaking across the mold surface, and no actual cutting — just dragging loaded material around. The fix is to start over with proper ultra-soft, oil-treated stones.
Grit Progression Discipline
Each stage has one job: remove the scratch pattern left by the stage before it. Skipping a grit carries deeper scratches into a finer stage that lacks the cutting power to remove them.
The failure mode is subtle — later diamond compound stages appear to be working until paste polish is applied and deep scratches emerge. At that point, you're returning to sandpaper regardless.
RPM and Heat Management
Exceeding 15,000 RPM during diamond polishing creates two problems simultaneously:
- Compound waste — centrifugal force throws compound off the surface before it can work
- Orange peel — heat generated at higher speeds deforms the aluminum surface into a textured, dimpled pattern that eliminates reflectivity
Orange peel is visible as a loss of glossiness under direct light — the surface looks matte and bumpy rather than smooth. Correcting it requires returning to 400–600 grit sandpaper to re-flatten before resuming diamond stages.
Cleanliness and Grit Contamination Control
Use separate labeled containers for each grit's stones, papers, and applicators. One 120 grit particle in a 600 grit stage creates a scratch that will show through the final polish.
Coarser scratches from contamination only become fully visible after paste polish is applied — at which point significant rework is already required.
Common Mistakes and How to Troubleshoot Them
| Mistake | What You'll See | Fix |
|---|---|---|
| Using standard (too hard) stones | Stone loads immediately, surface streaks, no cutting | Source stones labeled "ultra-soft" specifically for aluminum |
| Scratches visible at any stage | Deep lines visible under or through final polish | Identify the grit matching the scratch depth, clean all tools and the mold surface, then resume from that stage — no shortcut exists |
| Excessive RPM on diamond steps | Orange peel texture, lost reflectivity | Sand back to 400–600 grit, re-flatten, then resume the diamond sequence |
| Stone or brush loads up mid-stage | Abrasive stops cutting, surface drags | Re-soak stones fully and re-wet the surface every few passes |
Frequently Asked Questions
Can you make cast aluminum shine like chrome?
Aluminum can achieve a high-gloss, highly reflective finish through disciplined multi-stage diamond compound polishing. A near-mirror finish is realistic. However, aluminum won't typically match chrome's depth of reflectivity — it's inherently softer and will re-oxidize without a protective coating, gradually dulling the surface.
What grit should you start with when polishing an aluminum mold?
Starting grit depends on the current surface condition. Use a 120 grit ultra-soft stone for milled surfaces with visible tool marks; use 320 grit for ground or finer starting surfaces. Starting too fine when coarser marks are present produces poor results no matter how many stages follow.
Why do polishing stones load up so quickly on aluminum?
Aluminum is ductile and smears under abrasive pressure rather than shearing cleanly. That smeared material clogs the stone face rapidly. The solution is ultra-soft stones combined with liberal, frequent stoning oil application — both before starting and every few passes during work.
How does mold surface finish affect rotomolded part quality?
The interior cavity surface transfers its texture directly to the molded part. A well-polished mold produces smoother part surfaces, improves resin release, and reduces the risk of material sticking or tearing during demolding. In short, the finish you put into the mold is the finish you get out of the part.
How often should aluminum rotational molds be re-polished?
There's no fixed interval — frequency depends on production volume, resin type, and release agent use. Inspect the cavity regularly for pitting, oxidation buildup, or loss of finish; proactive light re-polishing is far less labor-intensive than waiting for significant degradation. Rotocast Technologies also offers mold repair and refurbishment services for molds that need full restoration.
What is the difference between the diamond compound grades?
Each grade (15 micron/blue, 3 micron/yellow, ½ micron/ivory) removes the scratch pattern left by the previous stage — coarser grades cut faster but leave a hazier surface, while finer grades refine toward high reflectivity. A functional mold surface may only require 15 micron; a near-mirror finish requires all three.